
Mechanical keyboards: A comprehensive guide
[ad_1]
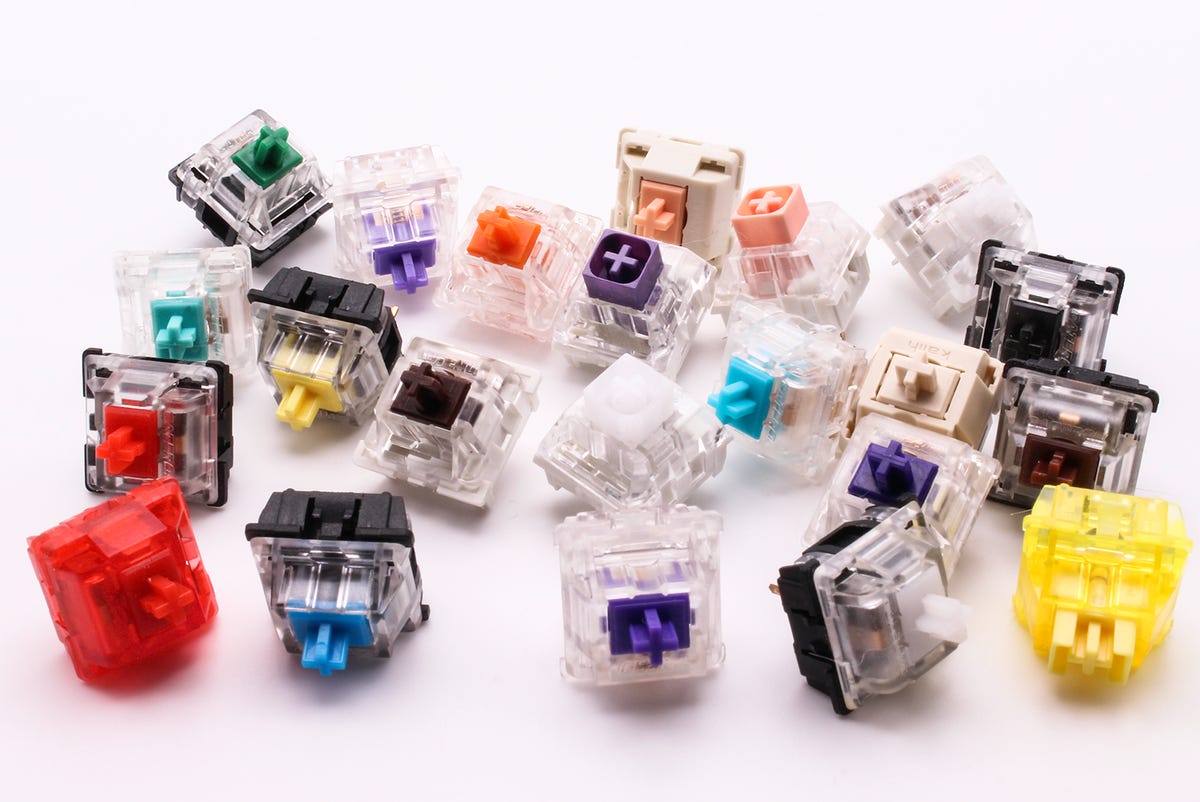
Just a small taste of the hundreds of mechanical keyboard switch varieties now being made.
Michael Gariffo
Mechanical keyboards may seem like they’ve only been around for the past several years or so. In reality, their lineage goes back multiple decades, to early consumer PC icons like IBM’s Model M keyboard. These early entrants defined the characteristics that modern mechanical keyboards continue to be valued for: a satisfying typing experience, a pleasing sound profile, and longevity that other keyboards can only dream of.
Table of Contents
What is a mechanical keyboard?
Mechanical keyboards derive their name from the mechanical switches used in each key. Most other standalone keyboards use rubber domes to suspend their keycaps and carbon pads to complete the circuit when you press a key. This setup (which mirrors a TV remote button) can feel mushy and imprecise to type on, and can wear out relatively quickly. Mechanical keyboards replace those domes with a metal spring and those pads with a metal leaf. A precision made plastic stem rides on the spring and closes the circuit by pushing the flexible leaf. This provides a more precise feel as well as greater longevity. It also allows for extremely customizable switch parameters, including spring weight, actuation point, tactile feedback, and more.
Also: The 5 best mechanical keyboards: From mini to macros
While the industry long ago left behind the buckling spring switches used in the Model M, the modern equivalents provide the same quality and tactility, while also supporting expanded sound, resistance, and actuation depth options. This makes it possible for both off-the-shelf and custom-built models to be tuned for practical typists, hardcore gamers, or productivity experts.
All of these technical variables might seem intimidating at first. That’s why we’ve put together this guide to help you understand the various components that go into a board, how those components affect your user experience, and which options might be right for you.
Whether you’re planning to buy a pre-built, entry-level mechanical keyboard, or you’re going to dive straight in and build your own custom-designed model, read on to learn everything you’ll need to know about cases, circuit boards, mounting plates, switches, and keycaps.
Keyboard reviews
The anatomy of a mechanical keyboard
Manufactured boards and custom-built units vary greatly in configuration, material quality, and component selection. However, there are five main components that exist within just about every board: a case, a circuit board (and accompanying electronics), a mounting plate, switches, and keycaps. Each of these has a massive impact on the combined performance, feel, and longevity of a board. We’ll be going into detail on each component below.
What you need to know about cases
A mechanical keyboard’s case is its outer shell. This is a good place to start because the choice of case defines numerous subsequent characteristics of a board.
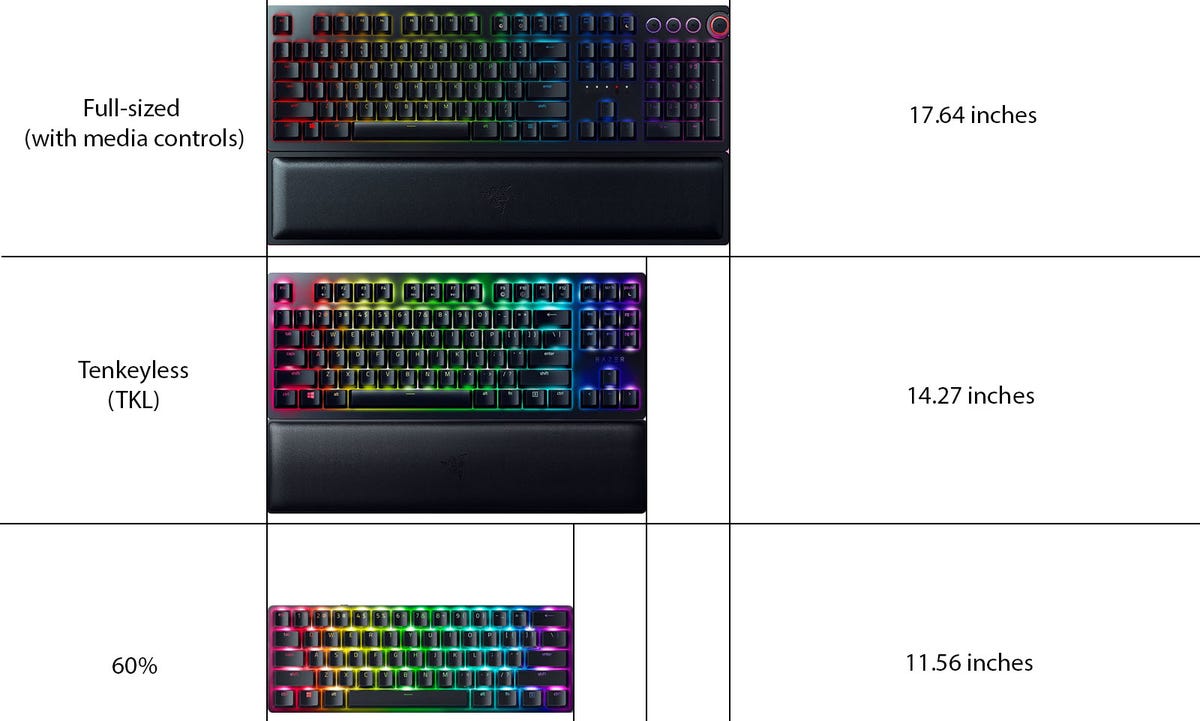
A comparison of the three main form factors and their widths in Razer’s current lineup. Each form’s size will vary between manufacturers.
Michael Gariffo
First, its size and shape outline the final form factor:
- Full-sized boards typically measure 16 inches wide, or more.
- Some gaming-centric boards can reach 20 inches, due to additional rows of macro and media control keys.
- Tenkeyless keyboards, which ditch the right-side number pad but keep everything else, typically measure a narrower 13 to 15 inches.
- Finally, 60% keyboards, can squeeze everything into less than 12 inches by sacrificing discrete editing and arrow keys in favor of a layered key functionality.
- Less common form factors such as 40%, 65%, and others also exist, but don’t see nearly as much pre-made support.
The second major impact a case will have on a board comes from the material it’s made from. Cheaper models tend to rely on plastic. This can produce a “hollow” feeling when typing, creating unpleasant resonance with each keystroke. However, this can be counteracted by adding foam, rubber, or silicone within the empty parts of the case to dampen vibrations.
Those very concerned with vibrations often opt for metal cases.
The Drop ALT, which uses a machined metal outer case.
Drop — Amazon
When in doubt, go with tenkeyless designs as a happy medium.
Some lower-cost options, particularly pre-made ones, tend to rely on thinner metal sheeting constructions. Meanwhile, more expensive pre-built boards and custom keyboards like the Drop ALT seen above, instead use cases machined from a solid slab of aluminum, much like Apple’s unibody MacBooks. This creates the densest cases, capable of absorbing the most sound and vibration.
Some custom-designed cases even include spaces for brass or steel inserts to add extra weight and further deaden unpleasant vibration.
Which case is best for you?
The size of case you choose should be based on your primary use and available desk space. Professionals that spend hours editing text will likely want a full-sized or tenkeyless board for access to the full range of keys, while gamers may choose a tenkeyless or 60% board for the extra mousing space they provide on your desk.
When in doubt, go with tenkeyless designs as a happy medium.
More: The best gaming keyboards: All the hits and clicks
Your choice in case material should be based on your budget. Plastic cases will almost always be cheaper, but can still feel quite pleasing with easily-added sound and vibration dampening. Even using a thick desk below can help. Meanwhile, metal cases, particularly unibody models, tend to be pricier, but offer the best sound dampening.
Choose whichever material your budget will allow, or whichever is offered by the pre-built model that most closely matches the total package best suited to your needs.
The circuit board
If you’re buying a pre-built board, you’re unlikely to have much choice on this component. Meanwhile, if you’re building a board, you’re limited by what fits into your chosen case and is compatible with the layout you plan to use.
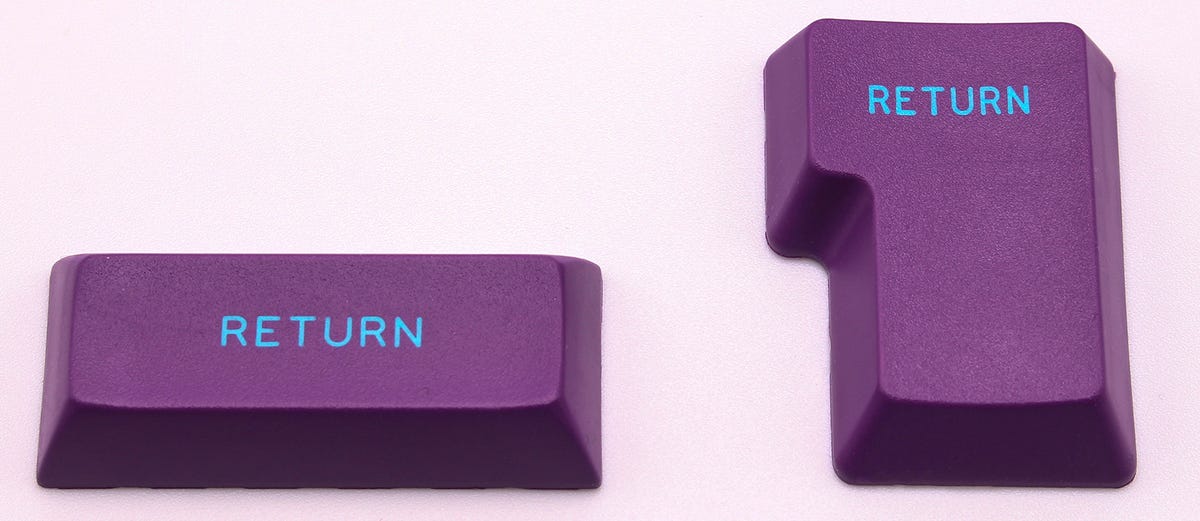
A standard sized ANSI Return (Enter) keycap (left) and a standard ISO keycap (right) from the same keycap set.
Michael Gariffo
What are ANSI and ISO?
The two most common standardized layouts are ANSI (American National Standards Institute) and ISO (International Organization for Standardization).
ANSI is what most US readers will be familiar with, recognizable by its rectangular Enter key aligned with the home row. Meanwhile, ISO uses a taller, narrower Enter key that spans the home and QWERTY rows. Most circuit boards support one or the other layouts, while some rarer models support both by offering additional soldering points for multiple switch configurations.
Some boards also include “hot swap sockets.” These small contacts are designed to eliminate the need to solder switches into the board. Instead, switches are pushed into place and held by the sockets’ metal contacts. This makes it quick and easy to experiment with new switch designs, repair faulty switches, or tinker with customizations like using different switch resistance weights for different keys.
A Keychron K8 with one of its hot swap sockets exposed.
Michael Gariffo
Aside from the part it plays in key layout and form factor compatibility, the circuit board also provides the keyboard’s connectivity. The most common wired options are MicroUSB, or the more modern USB-C.
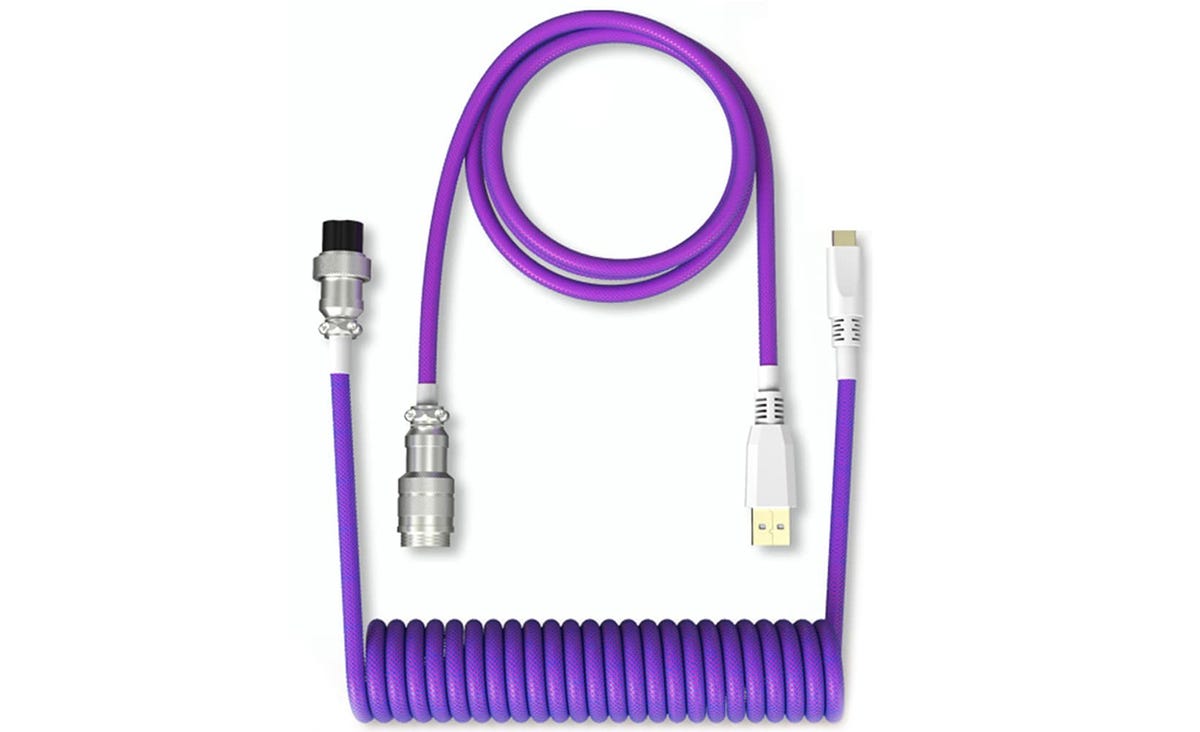
An example of a coiled replacement cable with a mid-run aviation connector.
N//B — Amazon
Some pre-made boards might also include a hard-wired data cable, which is soldered directly to it. However, even among pre-built options, it’s becoming increasingly common to support detachable cables for the popular option of adding a custom cable to your board. These aftermarket add-ons provide a way to add some flair via various colors and coiled designs, as well as visually interesting (if often pointless) mid-cable connectors. Changeable cables also ensure cable lengths suit your particular setup.
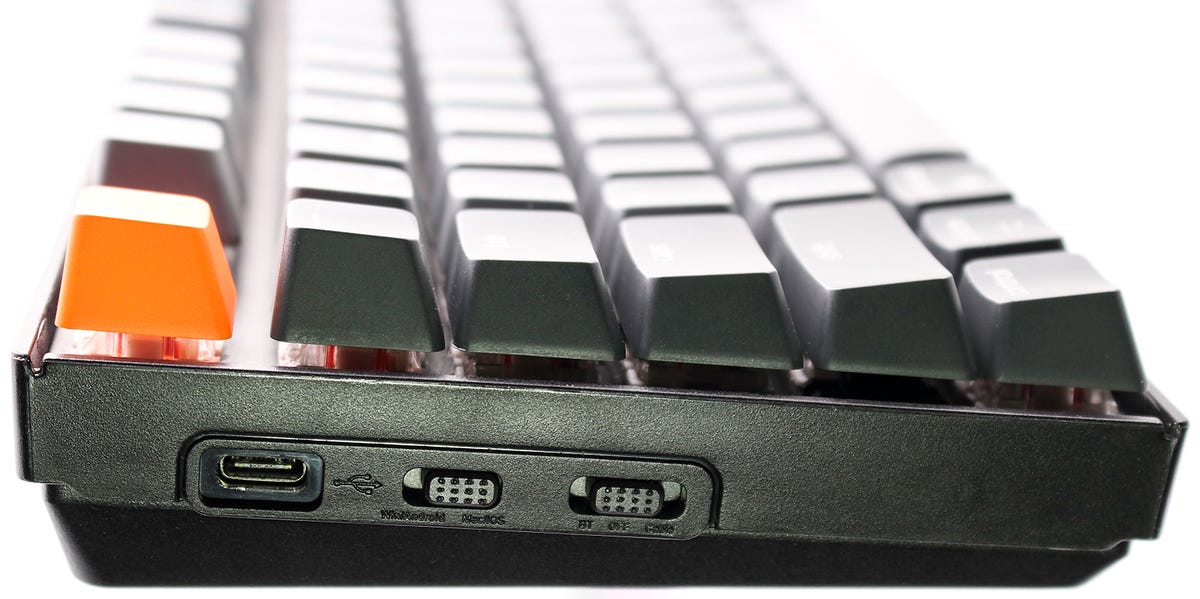
The Keychron K8’s switches for controlling OS-based layouts and Blutooth or wired mode.
Michael Gariffo
Finally, there’s also the option for wireless connectivity. Whether it’s 2.4GHz (common in gaming boards for its lower latency) or Bluetooth, this method of connection can be useful for slim laptops with no USB-A ports or when connecting to a tablet. Some models even support quick switching between wired and wireless modes, making it possible to swap between a PC and tablet, or multiple PCs.
Which circuit board is best for you?
This is a question for custom keyboard builds. If you’re purchasing a pre-built board, choose whichever total package provides the connectivity and layout options you’d prefer.
If you’re building a custom board, first make sure the circuit board fits your chosen case and supports your preferred layout. Next, ensure its connectivity options fulfill your needs. If you’d like to add your own cable, opt for a board with a USB-C port, which is supported by almost every custom and replacement cable maker. Meanwhile, if you’re going for wireless, consider the impact Bluetooth’s inherent latency might have on competitive gaming.
Lastly, consider lighting options. If you don’t care about backlighting, this isn’t an issue. But, if you’re dedicated to the flashy RGB lightshows, make sure the circuit board either includes or supports color-changing LEDs.

A brass mounting plate offered by Drop to customize the feel of its Carina keyboard kits.
Drop — Amazon
The mounting plate
In addition to being attached to the circuit board, key switches are typically inserted into a mounting plate. Most modern switches include a friction-fit design that allows them to clip into slots in this plate, adding extra support and preventing the stresses of typing from negatively impacting the delicate electronics and fragile solder points of the circuit board.
More: The best ergonomic keyboards: Work more comfortably
Some designs do skip this component, instead using the outer case as a mounting plate. These models tend to be of the type machined out of a single metal block. The Drop CTRL and ALT models are some of the best-known examples. In this configuration, the top side of each switch remains visible above the keyboard case. Some users prefer this for its ability to allow LED lighting to shine in all directions and the ease of cleaning it provides. But, others prefer their switches to be hidden within the confines of the board.
For both of these schools, pre-made and custom-built designs exist that support their preferred situation, while also providing another way to tweak the feel of their board. This tuning comes from the material of the mounting plate. Available materials include rigid aluminum or steel plates for solid typing with no flex whatsoever, as well as brass or even carbon fiber for those that prefer a bit more flex in their plates to prevent finger fatigue over a long day of typing.
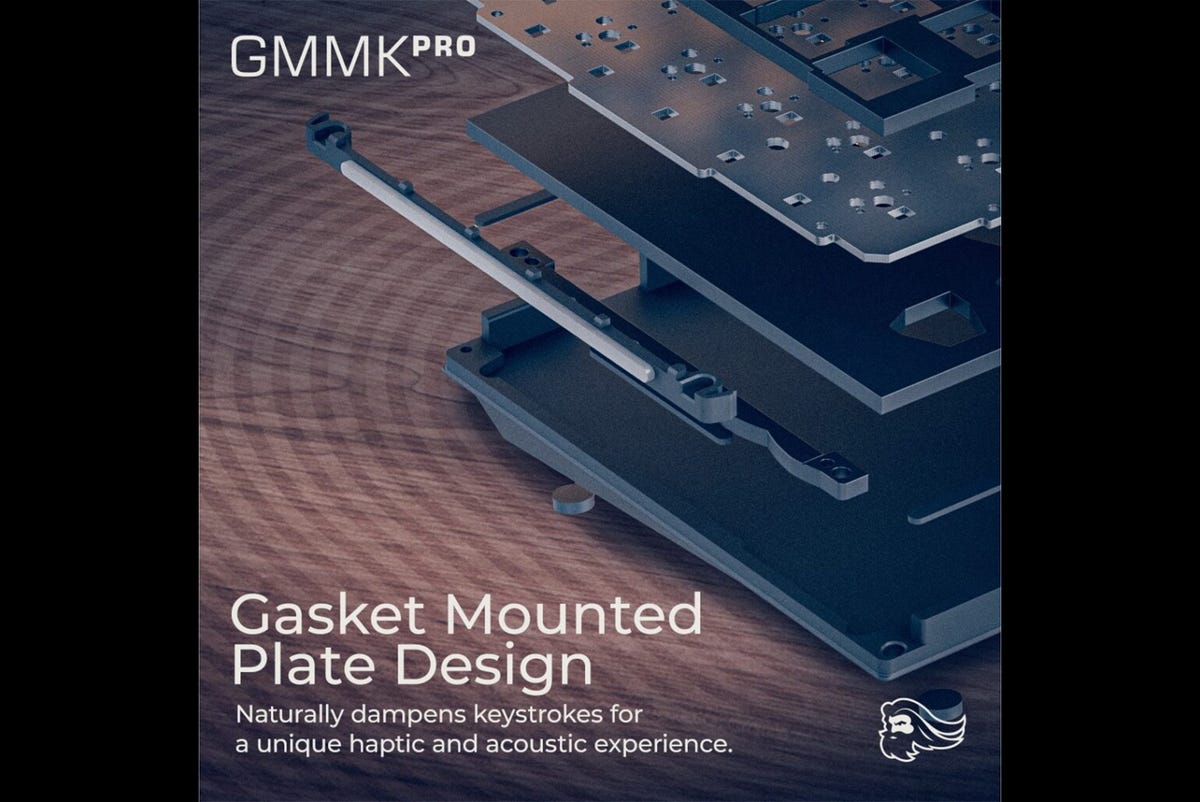
An example of how gasket mount boards are built published by Glorious for its GMMK Pro line
Glorious PC
For users wanting a truly cushy typing experience, some keyboards now support a gasket-mounted plate. This setup sandwiches the mounting plate and attached circuit board between rubber bumpers, with no rigid connection between the keys and outer case. Glorious PC is one of the first companies to offer this in a mass produced board via the GMMK Pro line. The result is a soft, bouncy feel that can be extremely quiet and comfortable. However, some users find it too imprecise and prefer a little more auditory feedback from their keystrokes.
Which mounting plate is best for you?
If you prefer a very solid typing experience, opt for a pre-built board that uses its case as a mounting plate, or one that includes a steel or aluminum plate. If you’re building a custom model, the recommendation for steel or aluminum holds.
If your fingers are often sore by the end of the day, a little give in your mounting plate might do you some good. Consider a brass, copper, or plastic option.
Lastly, if you want the quietest board possible, and don’t mind a bouncy feeling to your keystrokes, a gasket-mounted plate may be your go-to.
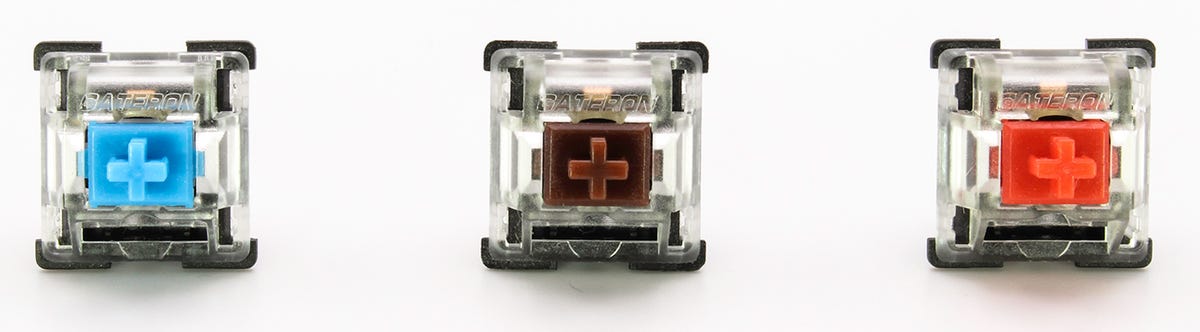
The three standard switch types in their traditional colors, made by Gateron. From left to right: Blue (clicky), Brown (tactile) and Red (linear).
Michael Gariffo
Key switches
This is the most variable and complex aspect of a mechanical keyboard. It’s also the single component that can most dramatically alter the feel and performance of a board. That’s why it’s so important to find the right switch for your preferences and needs. To help with that, we’ll cover the three main switch types, as well as how mechanical keyboard switches work in general.

Three deconstructed switches. From top to bottom: lower shell (with leaf), top shell, spring, and stem. From left to right: Zeal PC Zealio V2 (tactile), Gateron Ink Red (linear), and Gateron Green (click). Note the difference in the “legs” on the stem, which defines the switch type.
Michael Gariffo
The anatomy of a switch
Just about every switch includes four main components: its shell, a spring, a key stem, and a leaf.
-
The shell – This is the outer casing. Its two-piece construction encloses all of the other components when it’s clicked shut. The material used in it can affect vibration and sound, while the quality of its construction can impact how wobbly your keys are.
-
The spring – This determines how much weight is required to depress the key, typically ranging from 35g to 100g. Heavier weights are more fatiguing over the long-term, but also prevent accidental keypresses. Lighter weights are preferred by gamers for the few milliseconds they shave off a keypress to aid in-game performance
-
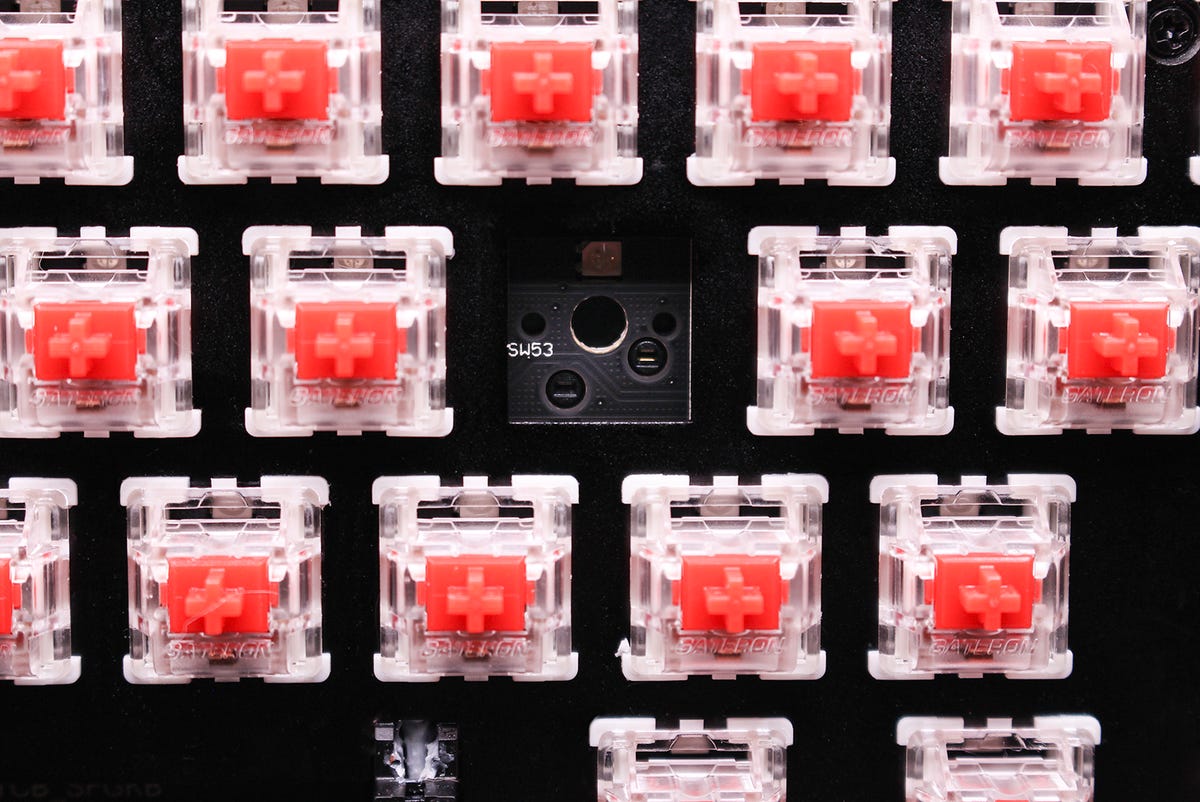
The stem – This is the most important part of the switch because it determines the type of switch (tactile, linear, or clicky — illustrated above) as well as what keycaps are supported. Most stems use a CherryMX profile (a tiny + shape that sometimes includes a surrounding circle or square for stability — seen in our top image) or, more rarely, an ALPS (a hollow rectangle with four protrusions) stem. Both are named for the eponymous companies that created their design. CherryMX stems are supported by nearly every manufacturer of pre-made or custom boards.
-
The leaf – This is the only metal part of the switch. It exists, by default, with a small gap in its circuit. When the key is depressed, the “legs” of the stem push the leaf, close the circuit, and actuate the switch. In clicky switches, the leaf also makes an audible sound upon actuation.
These four components combine to determine the main characteristics of a switch: type, weight, actuation point, and feel.
- Type – As mentioned above, there are three main types: “Clicky,” which provides tactile and audible feedback at actuation; “tactile,” which provides quieter audible feedback with a pronounced tactile “bump” at the point of actuation; and “linear,” which is the quietest and smoothest, but provides no tactile or audible feedback at actuation.
-
Spring weight – As mentioned above, this determines how hard it is to press a key. Heavier weights are preferred by more aggressive typists, and can be used in switches that are annoying to accidentally actuate, like Caps Lock. A few tinkerers even choose different weights for each switch based on which finger will most commonly be activating each key. Lighter weights are chosen for weaker ring and pinky fingers, while heavier weights are used for middle and index finger keys.
-
Actuation point or depth – This is determined by the stem and leaf. A higher actuation point means keypresses will be registered earlier in the key travel, while a lower point means it will take place later. Higher actuation points are popular among gamers for their faster responsiveness. Unfortunately, they can also make keys more prone to accidental presses, increasing typos. Some pre-made boards that use optical or analog switches (which we’ll cover in detail below) have customizable actuation points to provide the best of both worlds.
-
Feel – This is determined by the precision of the switch’s construction, particularly the quality of the stem and shell, what materials they’re made of, and whether the switch has been lubricated. Ideally, most users want as little stem wobble as possible, with a very smooth up-and-down motion being interrupted only by the intentional tactile bump or click. Linear switch users prefer no interruptions at all.
Which key switch is best for you?
This is outlined in detail throughout the bulleted lists above. But, the TL;DR version is:
- Practical typists may be best served by a tactile or clicky switch of medium weight with a medium to low actuation point.
- Gamers will likely prefer lightweight linear switches with a high actuation point.
More: The best keyboards: Because you deserve better
This is, of course, all highly subjective. Some gamers prefer tactile switches for the assurance they provide that a keypress was registered. Meanwhile, some typists (yours truly included) opt for linear switches because they prefer the smoothness and find the occasionally required correction a worthwhile trade-off. I’d recommend visiting a brick-and-mortar retailer with mechanical keyboard demo models on display. This should let you try each main switch type to see which one really feels best for you.
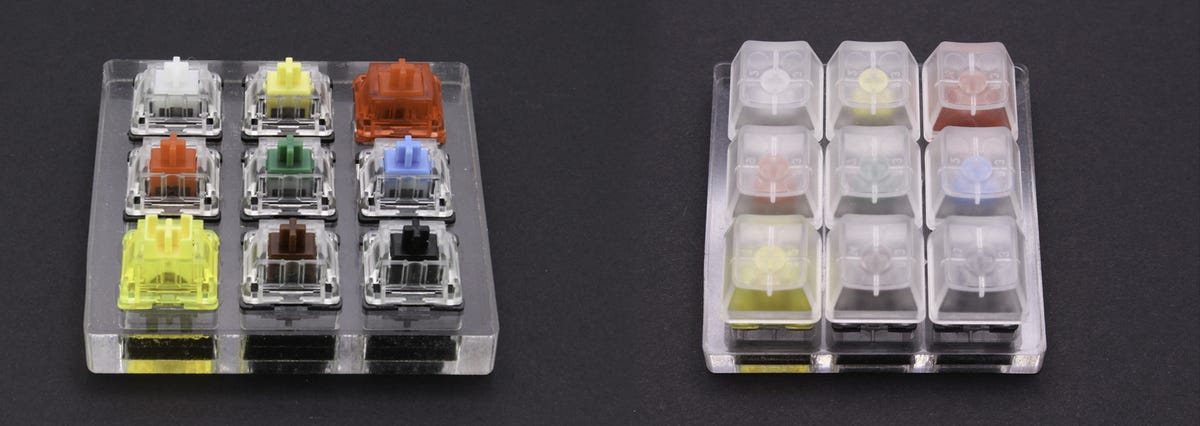
A nine-key switch tester that comes with pre-installed Gateron switches and unmarked keycaps
Michael Gariffo
If you want to invest a small sum into being absolutely sure, buy one, or a few, of your prospective switches and used them in a switch tester. This is a small equivalent of a mounting plate, designed to hold switches while testing their feel and sound. These inexpensive items, like the one using Gateron switches seen above, can be had for less than $20, or even 3D printed easily. They’re well worth the investment if you’re planning on turning mechanical keyboards into a full-fledged hobby.
A note about optical and analog switches
In addition to the traditional mechanical switches we’ve covered, many manufacturers have introduced optical and analog key switches. I won’t get into the debate over whether or not these products really qualify as mechanical keyboards anymore. But, most makers market both switch types alongside standard mechanical options, and some, like Razer, even make boards that can be configured with mechanical, optical, or analog switches in the same model.
The main thing optical switches claim to offer over their mechanical counterparts is longevity. Rather than relying on a metallic leaf, which can wear over time, they use a tiny beam of light. The stem interrupts this beam, triggering the switch with no physical contact. While there are certainly fewer moving parts to fail in optical switches, the need for supposedly increased longevity is debatable. Most mechanical switches are rated to last through millions, if not tens of millions, of keypresses. In over a decade of using dozens of mechanical keyboards, I’ve had a grand total of two mechanical switches fail.
More: Five cool control surfaces for gaming, streaming, and creativity
Analog switches are the newest kid on the block. They add an extra layer of sensitivity to keyboards by replacing the binary on/off position of a mechanical switch with gradually-increasing sensitivity, like a car’s accelerator or a console controller’s analog stick. They’ve grown in popularity recently with gamers for their ability to provide a way to control walking speed, acceleration, and other in-game actions using a single key being depressed to a controllable depth.
In-game support for such keyboards remains scattered. But, they are a growing portion of the market.
Whether or not these complex switches eventually come to replace their mechanical counterparts depends on how widely adopted the tech becomes among game makers, and if keyboard manufacturers can convince the average user they’re worth the $50 to $75 average upcharge they add to most supported keyboard models.
Keycaps
Often the most visually obvious part of a keyboard, keycaps can alter far more than just aesthetics. Variances in specific keycap profiles, materials, and legends (the letter, numbers, and symbols printed on them) can greatly affect performance, longevity, and feel. We’ll discuss all three considerations below.
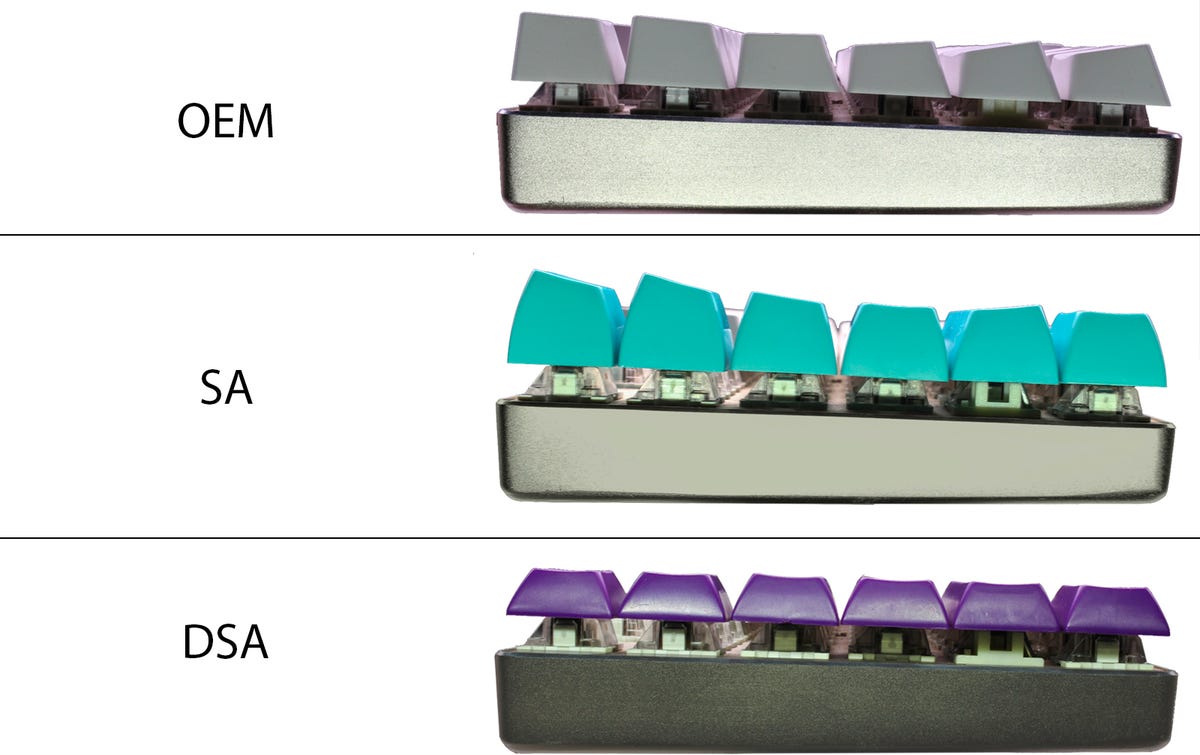
The three most common keycap profiles drastically altering the shape and height of the exact same mechanical keyboard model.
Michael Gariffo
Keycap profiles
There are several standardized keycap profiles and innumerable non-standard variations. That said, the vast majority of pre-built keyboards on the market stick to what’s called an OEM (Original Equipment Manufacturer) profile.
OEM: Within the OEM profile, each key includes a cylindrical indent on top to center your finger. This indent is identical across all 1u keys (alphabet and punctuation keys, as well as number and function keys). But the individual heights of each keycap will vary based on which row it’s in. Keyboard rows are numbered from the top down, starting at the number row (R1) and progressing through the QWERTY row (R2), home row, (R3) bottom row (R4), and space (sometimes called R5). The function row above the number row generally sits at the same height as R1.
These differing heights create a slight curve across the Y axis, helping your fingers land on keys in a flat position as they stray from the home row. Some find these variations beneficial to comfort, while others believe they’re a silly holdover from when typewriter keys needed to be different heights to ensure their mechanisms didn’t collide.
Which side of this debate you fall on will determine which of the two other most common profiles you might like.
SA: For those that wish OEM’s curvature was steeper, there’s the SA profile. It offers taller R1 and R4 keys and swaps out the cylindrical indent for a spherical one. These keycap sets have a certain retro appeal due to their similarities to early models like the aforementioned Model M. Some prefer the cushy feeling of their fingertips nestling into that round indent, but others find their height uncomfortable
DSA: On the other side of the coin is DSA. This profile uses the same height for every row. The result is a laptop-like typing experience with lower-profile caps and no variation in the angle of each key. This has the added benefit of making keys interchangeable between rows, which can be hugely helpful when attempting to replace caps on a non-standard layout for which row-specific keycaps with appropriate legends are unavailable.
Chiclet: Lastly, some ultra-low-profile mechanical keyboards use what are called “chiclet” keys, essentially flat squares. These models usually also include low-profile switches, which provide shorter travel distances to reduce their height. I’d only recommend these for users that want the feel of typing on a laptop, even when using a discrete keyboard.
Keycap materials
The two most popular keycap materials are ABS (Acrylonitrile Butadiene Styrene), which is commonly used in 3D printing and Lego bricks, and PBT (Polybutylene Terephthalate). Both are tough forms of plastic designed to hold up to the tapping, finger oils, and friction a keyboard experiences.
ABS is sometimes seen as the budget option due to its common inclusion in cheaper keyboards. However, reality is more nuanced than that. Some high-end keyboard and keycap makers actually opt for ABS due to its better sound dampening, more vibrant color replication, and resistance to the warping and bending PBT caps can suffer during manufacturing. ABS is also better for translucent keys designed to allow RGB lighting to pass through.
PBT, meanwhile, is far more resistant to the wear and collection of finger oils that produce the shiny look and slick feel many older keyboards eventually suffer from. It also creates a sharper sound profile and has a slightly grittier surface that some typists prefer. However, it doesn’t accept dye as well, and often requires doubleshot legends (more on these below), which adds to the price.
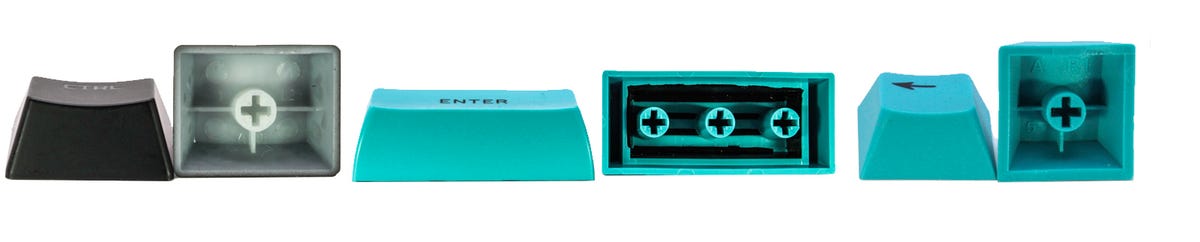
Left to right: A HyperX keycap with opaque printing over tanslucent ABS to provide shine-through legends, a doubleshot Drop X MITO Pulse SA keycap, and a NovelKeys Cherry Taro keycap made of blue PBT with black printing.
Michael Gariffo
What are legends?
These are the characters on each key that let you know what it does. Although some keycaps sets are made without any legends (a flex for the true touch typists out there) most include a standard selection of letters, numbers, punctuations, and modifiers. While the font of choice can vary somewhat, the biggest difference impacting keycap quality is how its legends are added.
The most common method is printing. In this circumstance, an opaque keycap is printed (commonly via silicone pad or spray application) with a pigment in the legend color the manufacturer chooses. This has the benefit of being cheap, but it has the risk of eventually wearing off with long-term use (seen on the right above).
Some keycaps, particularly those designed to support RBG backlighting, are created the opposite way: a pigment is applied to a translucent cap’s entire surface, except where its legend is located. This blocks light overall bleed but allows the character displayed on the cap to glow (seen on the left above).
If mechanical keyboards are a rabbit hole that hobbyists can spend years falling down, then keycaps are a whole cave system unto themselves.
Lastly, there are doubleshot keycaps. This type of keycap consists of two discrete layers. Each layer is precisely cast so that they can be stacked to create the final cap. The top layer includes a piercing in the shape of the required legend, while the bottom layer includes a protrusion in the exact same shape and size that slots into that piercing so tightly there are no detectable gaps (seen centered above).
Also: How to clean a mechanical keyboard
This last type of caps has the benefit of being essentially wear-proof. You’d need to rub through their entire structure to erase a legend. However, the complexity and precision required to build them mean they’re the most expensive option, by far.
Which keycaps are best for you?
If mechanical keyboards are a rabbit hole that hobbyists can spend years falling down, then keycaps are a whole cave system unto themselves.
Preferences on profile, material, aesthetics, and longevity are so subjective it’s pointless to offer you any other advice than “try out as many as you can and see what you like.”
That said, good keycaps don’t have to be expensive. I own several small-batch sets that cost hundreds of dollars. Meanwhile, I’m typing this article on a $50 set from Matrix Keyboards that I like for its aesthetic and the availability of matching caps that fit my Drop ALT’s non-standard layout.
Keycap quality can have a massive impact on the feel of your board, but don’t let manufacturers lead you down the garden path. Printed, ABS keycaps with thick walls can feel just as good and last almost as long as doubleshot PBT keycaps that cost 10 times as much. Buy what you like, what you can afford, and what suits your personal aesthetics.
A trio of small-batch artisan keycaps with shine-through sections to glow when used on backlit keyboards.
Michael Gariffo
Lastly, if you want another rabbit hole to fall down, take a look at the thousands of artisan keycaps made by global manufacturers and small producers, all of which can make your keyboard both a useful peripheral and an expression of your personal artistic tastes.
Final thoughts
By now you know whether or not mechanical keyboards are for you. More than ever before, companies are making the bar for entry into this hobby an attainable one. How deeply you invest depends on how particular you are about the feel of your typing or gaming experience and what your budget can handle.
More: The best mechanical keyboards: From mini to macros
This can be an extremely expensive hobby, but it doesn’t have to be. Cheap, good quality, attractive boards are becoming increasingly available as the hobby expands. Don’t let any jaded mech key gatekeepers out there intimidate you away from the many fun and affordable paths into mechanical keyboards.
Also, don’t feel like you need to be an experienced technician just to sign up. There’s absolutely nothing wrong with grabbing a great off-the-shelf model from one of the manufacturers ZDNet has reviewed and leaving it exactly as is. Just make sure that board suits all of your needs and preferences out of the gate. If you follow this simple advice, you should have a great typing and gaming experience ahead of you for years to come.
My top three picks for off-the-shelf mechanical keyboards:
You can check out my round-up of the best mechanical keyboards here, or see the cheat-sheet version below.
[ad_2]
Source link


